Setting up the clock on your brand new or used vehicle is one of the first things you do whenever you’re taking it out for a ride. As such, knowing the process to change time is essential for you to have a hassle-free experience when you’re adventuring outdoors. For proud owners of a brand new or used Honda Pilot, read further in order to set up the clock on your new vehicle.
Honda Pilot: How to set the clock
Before changing the clock settings on your Honda Pilot, make sure that your vehicle is at a complete stop and is positioned on [Park]. Otherwise, have the vehicle’s engine turned [Off] to ensure your safety.
Honda Pilot 2005-2008
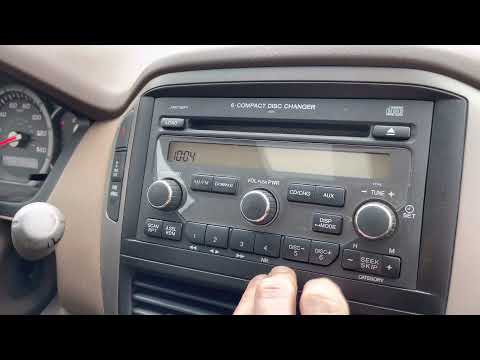
To set the clock on your 2005-2008 Honda Pilot, set your vehicle on the [On] position without starting the vehicle’s engine. Afterwards, press and hold the [Tune] knob on your instrument panel until it beeps. The [Tune] knob has [+] and [-] buttons below to set the clock in minutes and hours. Once you’ve set up the correct time, press the [Tune] knob again to finalize the set-up.
Honda Pilot 2009-2015
The 2009-2015 models of the Honda Pilot feature a similar setup when it comes to changing the clock on your vehicle. As with the 2005-2008 models, set your vehicle on the [On] position without starting the engine. Afterwards, press and hold the [Clock] button on your instrument panel until the time starts flashing on the screen. The numbers [4] and [5] on top of your [Clock] button let you enter the hour and minutes according to the correct time. If your vehicle has steering wheel controls, then you can also use it as well to input the time. Once done, simply press the [Clock] button again to finish your set-up.
Honda Pilot 2016-Present
Honda Pilot models from 2016 models up to the present use a navigation screen in place of knobs and buttons which means setting up the clock is a tad different when compared to previous Honda Pilot Models. Some models equipped with Nav screens set the clock automatically, so setting up the clock shouldn’t be a problem. Otherwise, here are the steps if you want to set up the clock for your Honda Pilot manually.
As with previous generations, set your vehicle in the [On] position without starting the engine. Once done, go to [Home] – [Settings] – [Clock] – [Clock Adjustment]. On the [Clock Adjustment] screen, simply set your preferred hour and minutes, then touch the [AM] or [PM] icon to set day or night. For Honda Pilot vehicles with steering wheel controls, you can also use the [Up] and [Down] buttons to change the time. It’s also possible to select between 12-hour and 24-hour formats depending on your preference. Once all are set, just touch the [Ok] button to finalize the set-up.
Setting the clock based on Honda Pilot Owner’s Guide
On vehicles with navigation built-in in the car, the time should be set automatically using your vehicle’s GPS signals. To manually adjust your clock settings, you may refer to the steps above based on your Honda Pilot’s year model as it’s based on the actual owner’s manual.
Honda Pilots with Display Audio meanwhile are equipped with an automatic date and time set-up feature. This can be turned off anytime if you want to manually adjust the time. Simply use the steps above if you want to set up the time yourself.
Why do you need to know how to set the clock on your Honda Pilot?
The clock settings on your Honda Pilot resets after every battery change. If you’re driving an older Honda Pilot model, then it’s essential to set up the time yourself due to this fact. Newer models meanwhile don’t have this problem but knowing to change it yourself is a must especially when you frequently travel to a different time zone.
What to do if the clock doesn’t change when setting it up?
If you’ve done the steps to change your Honda Pilot’s clock settings but the time did not change, then it’s recommended to bring your vehicle to an authorized professional of your local dealership to have your car checked.


